
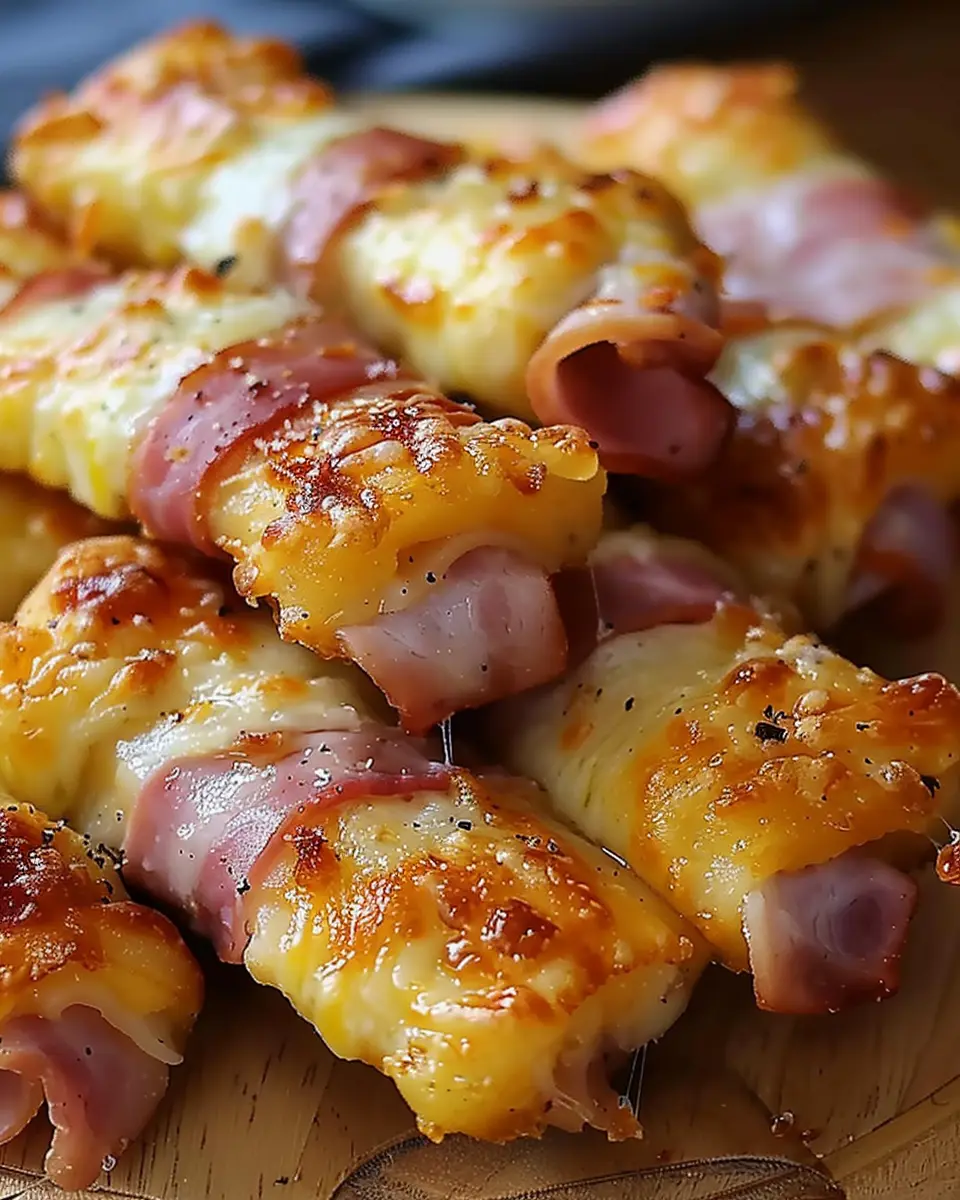
Introduction to Ham and Cheese Sticks
Creating your own snacks can truly be a game changer for young professionals juggling busy lifestyles. Gone are the days when grabbing a bag of chips or a sugary granola bar felt like your only option between meetings or while working from home. Instead, imagine reaching into your fridge and pulling out some deliciously homemade ham and cheese sticks. They’re not just tasty; they’re quick to make, packed with flavor, and can be enjoyed any time of the day.
Why are homemade snacks essential? One significant advantage is control over the ingredients. According to the Harvard School of Public Health, making snacks at home allows you to prioritize nutrition, avoiding hidden sugars and preservatives often found in store-bought varieties. Plus, when you make snacks like ham and cheese sticks, you can personalize them to fit your preferences—add spices, switch cheeses, or even incorporate your favorite veggies.
Another reason homemade snacks shine is that time management becomes less daunting. When you have easy-to-make options on hand, you’re more likely to resist the temptation of unhealthy options during those late-night work sessions. Picture this: it’s 3 p.m., your energy is dipping, and you remember you have some cheesy, crispy ham and cheese sticks ready to go. Just a few minutes in the oven, and you’re back at it with a satisfying, wholesome snack!
Lastly, these ham and cheese sticks are highly portable. They fit easily in your lunch bag or are perfect for an afternoon grazing session between tasks in your home office. Just grab a few sticks, and you’re set for your conference calls or project deadlines.
In the following sections, I’ll walk you through the easy process of making ham and cheese sticks, offering tips and alternatives along the way. Get ready to revolutionize your snack game—your tummy and your busy schedule will thank you!

Ingredients for Ham and Cheese Sticks
Essential ingredients for a delicious homemade treat
Creating the perfect ham and cheese sticks at home is a rewarding experience, especially when you know exactly what goes into them. Let’s gather some essential ingredients that will make these treats a delightful addition to any occasion!
- Chicken Ham: Opt for either deli slices or diced pieces for a savory base. Chicken ham is lower in fat and provides a delicious, smoky flavor.
- Turkey Bacon: This is a fantastic alternative to traditional bacon. It offers a crunchy texture and adds a unique twist to your ham and cheese sticks.
- Cheese: Choose your favorite melting cheese, like mozzarella or cheddar. The gooier, the better!
- Puff Pastry: The star of the show! Frozen puff pastry will create a flaky and crispy texture that pairs wonderfully with the filling.
- Seasonings: Don’t forget to include salt, pepper, and herbs of your choice. They can elevate your flavors significantly.
For tips on selecting the best quality ingredients, check out this guide on deli meats. Remember, the fresher your ingredients, the better your ham and cheese sticks will taste!
Preparing Ham and Cheese Sticks
Creating delicious ham and cheese sticks at home can be an enjoyable and satisfying experience. Whether you’re prepping a snack for movie night or treating friends, this flexible recipe is sure to impress. Let’s delve into the process, breaking it down into manageable steps that even a busy young professional can handle.
Gather Your Ingredients and Tools
To kick off your cooking adventure, you’ll need to stock up on some key ingredients and tools. Here’s what you should gather:
Ingredients
- 1 tube of crescent dough
- 1 cup of chicken ham, sliced
- 1 cup of cheese (cheddar or mozzarella work great)
- 2 tablespoons of butter, melted
- 1 teaspoon of garlic powder (optional)
- 1 teaspoon of dried parsley (optional)
Tools
- Baking sheet
- Parchment paper (for easy cleanup)
- Rolling pin (if needed for flattening dough)
- Pizza cutter or knife
By having everything ready, you’ll keep the cooking process smooth. Cooking can feel like a race against time, so preparation is essential!
Preheat Your Oven and Prepare the Baking Sheet
Once your ingredients are on hand, preheat your oven to 375°F (190°C). This step is crucial to ensure even cooking and a perfectly golden finish. While the oven heats up, line a baking sheet with parchment paper. This not only makes for easier cleanup but also prevents the ham and cheese sticks from sticking to the pan.
Roll Out the Crescent Dough and Cut It
Now for the fun part! Unroll your tube of crescent dough on a lightly floured surface or right on the parchment paper. If you prefer thinner sticks, use a rolling pin to stretch it out a bit. Next, using a pizza cutter or knife, cut the dough into rectangles. Each rectangle should be about 3 inches by 4 inches—perfect for wrapping up that delicious filling.
Layer Chicken Ham and Cheese
Here comes the creative part: layering! Place a slice or two of chicken ham in the center of each rectangle, followed by a generous sprinkle of cheese. Feeling adventurous? You can add a dab of mustard or a sprinkle of pepper for an extra flavor kick.
Think about how wonderful it is to work with different flavors. Did you know that varying your ingredients can create different taste profiles? For more tips, check out this culinary guide for inspiration!
Seal and Brush the Sticks with the Butter Mixture
Once you’ve added your layers, fold over the dough to create a pocket and pinch the edges to seal them tight. This ensures that all that juicy goodness stays inside during baking.
In a small bowl, combine your melted butter with garlic powder and parsley (if using). This buttery mixture will not only add flavor but also give your ham and cheese sticks a lovely golden hue. Brush the mixture generously over the tops of the sealed dough pockets.
Bake Until Golden Brown
Finally, it’s time to place your baking sheet in the oven. Bake for 12-15 minutes or until the ham and cheese sticks are puffed and golden brown. The aroma wafting through your kitchen will be irresistible!
While you wait, feel free to prepare a dip, like ranch or marinara, to serve alongside your creation. The combination of gooey cheese and salty chicken ham wrapped in flaky dough will make your efforts worthwhile. Once they’re done, let them cool for a few minutes before diving in—it’ll be hard to wait, but trust me, your taste buds will thank you!
Enjoy making your ham and cheese sticks! Share them with friends, serve them at your next gathering, or enjoy them all to yourself. Whatever you choose, these delightful snacks are bound to be a hit. Happy cooking!
Variations on Ham and Cheese Sticks
Creating ham and cheese sticks at home opens the door to a world of delicious variations that can cater to different tastes and dietary preferences. Here are a couple of fun ideas to elevate your snack game.
Add Your Favorite Herbs and Spices for Extra Flavor
Boosting the flavor profile of your ham and cheese sticks is easier than you might think! Consider these options:
- Thyme and Rosemary: These earthy herbs add a rustic touch. Just sprinkle some dried herbs into your dough or mix them into your cheese blend before assembly.
- Paprika or Cumin: Just like that, you can add a hint of smokiness or warmth. These spices can provide an unexpected twist your taste buds will love.
- Garlic Powder and Onion Powder: For those craving that savory flavor kick, these pantry staples make a world of difference.
Don’t hesitate to experiment! A pinch here or there can turn your humble sticks into gourmet fare.
Explore Cheese Options Beyond Cheddar
While cheddar is a classic cheese choice, expand your horizons! Try these alternatives for a different flavor experience:
- Mozzarella: For a gooey, stretchy texture, mozzarella is hard to beat. It pairs wonderfully with chicken ham and maintains that delightful pull when melted.
- Pepper Jack: If you’re after a spicy kick, pepper jack cheese is a fantastic option. It adds flavor without overpowering the other ingredients.
- Feta or Goat Cheese: For a creamy bite, these cheeses can lend a tangy touch, especially when mixed with herbs.
If you’re feeling adventurous, why not explore a local cheese shop? They often have unique varieties that could make your ham and cheese sticks unforgettable!
By introducing these simple variations, you’re set to elevate your next gathering or solo snack time. Wouldn’t that make your taste buds dance?
Overall, don’t hesitate to mix and match flavors! After all, the best part of cooking is making it your own. For more creative culinary ideas, check out resources like Serious Eats or Bon Appétit. Happy cooking!
Cooking Tips and Notes for Ham and Cheese Sticks
Ensure Optimal Dough Handling
When working with dough for your ham and cheese sticks, it’s essential to keep your hands and surfaces lightly floured. This helps prevent sticking and allows for easier shaping. If you’re finding your dough too sticky, you might be tempted to add more flour—resist that urge! Adding too much flour can lead to tough sticks. Instead, you can chill your dough for a few minutes; cold dough is generally easier to handle.
Adjusting Bake Time Based on Oven Type
Keep in mind that bake times can vary depending on your oven type. If you’re using a conventional oven, start checking your ham and cheese sticks about 5 minutes before the suggested baking time. For convection ovens, a shorter bake time may be necessary since they cook more evenly and quickly. Remember, you’re aiming for a golden-brown finish. If you’re unsure, consult this baking guide to help you navigate adjustments with confidence.
Using these tips will ensure that your ham and cheese sticks turn out delicious every time!

Serving suggestions for Ham and Cheese Sticks
Perfect pairing with dips and sides
When it comes to serving ham and cheese sticks, the right accompaniments can elevate this snack to a delightful feast. Consider pairing them with:
- Creamy Ranch or Garlic Dip: These flavors enhance the savory notes of the chicken ham and cheese, creating a delicious contrast.
- Spicy Mustard or Honey Mustard: Adding a touch of heat or sweetness can make the dish even more dynamic.
- Fresh Veggies: Crisp carrot sticks, cucumbers, or bell peppers not only provide a healthy crunch but balance the richness of the dish.
For some inspiration, check out this guide on dips for more creative ideas.
Serving at parties or casual gatherings
Ham and cheese sticks are perfect for both cozy gatherings and larger parties. They’re easy to grab and enjoy, making them a hit with guests of all ages. Arrange them on a platter with toothpicks for easy serving, and don’t forget to add a variety of dips. Trust me, your friends will appreciate the effort!
For something extra, try serving them alongside a fresh salad or a charcuterie board. This combination not only boosts the visual appeal but also allows everyone to customize their plates. Whatever the occasion, these tasty treats are sure to impress!
Time Breakdown for Ham and Cheese Sticks
Preparation Time
Getting ready for your ham and cheese sticks adventure takes about 15 minutes. This is when you’ll gather your ingredients, slice the chicken ham, and prep the cheese. A little tip: if you’re short on time, consider pre-sliced cheese to speed things up.
Cooking Time
Once you’re prepped, cooking the ham and cheese sticks should take around 10-12 minutes. Just enough time to give them that golden, crispy finish. You’ll want to keep an eye on them to ensure they don’t overcook!
Total Time
In total, you’re looking at approximately 25-27 minutes from start to munch! Perfect for a quick snack or a delightful appetizer for your next gathering. For more tips on how to make the most of your cooking time, check out The Kitchn for helpful kitchen hacks!
Nutritional facts for Ham and Cheese Sticks
Calories and key nutrients
When savoring delicious ham and cheese sticks, understanding their nutritional profile can help you enjoy them guilt-free. Typically, a serving contains around 250 calories, highlighting a good balance of nutrients. They usually offer:
- Protein: Approximately 12-15g from the chicken ham and cheese, essential for muscle repair and growth.
- Fat: Around 15-20g, which includes healthy fats if you opt for a low-fat cheese.
- Carbohydrates: Often about 20g, primarily from the dough or breading, giving you that much-needed energy boost.
For more details on daily nutrient intake, check out sources like the USDA Nutrient Database.
Healthy alternatives
Instead of the classic version, consider swapping ingredients for a healthier twist!
- Substitute chicken ham with turkey bacon for a leaner option.
- Opt for whole grain or almond flour instead of traditional flour for added fiber.
- Try reduced-fat cheese or plant-based cheese alternatives for a lighter option.
These tweaks not only enhance the nutritional value but also cater to varied dietary preferences. So next time you whip up some ham and cheese sticks, feel free to experiment!
FAQs about Ham and Cheese Sticks
Can I use different types of meat or cheese?
Absolutely! One of the best things about ham and cheese sticks is their versatility. If you’re looking to mix it up, consider using turkey bacon or chicken ham for a tasty twist. You could even try swapping out the cheese for something like pepper jack for an extra kick or mozzarella for a gooey melt that’s hard to resist. The possibilities are nearly endless!
How to make Ham and Cheese Sticks ahead of time?
Preparing ham and cheese sticks in advance is a smart move if you’re hosting a gathering or want some easy snacks stocked up. Just follow these steps:
- Prepare the sticks as directed in your recipe but do not bake them yet.
- Assemble the sticks and place them on a baking sheet lined with parchment paper.
- Freeze the sticks for about 1-2 hours until they are solid.
- Once frozen, transfer them to an airtight container or zip-top bag and store them in the freezer for up to three months.
When you’re ready to bake them, there’s no need to thaw—just pop them in the oven and add a few extra minutes to the baking time.
What dipping sauces work well with these sticks?
Great question! Dipping sauces can elevate your ham and cheese sticks even further. Here are a few delectable options:
- Garlic Aioli: A creamy, garlicky dip that complements the savory flavors beautifully.
- Honey Mustard: The sweet and tangy notes really bring out the richness of the cheese.
- Ranch Dressing: A classic that never fails to delight, especially for those who love a creamy texture.
For more ideas, check out this dipping sauce guide. What’s your favorite dipping sauce? Let me know in the comments!
Conclusion on Ham and Cheese Sticks
Creating homemade snacks like ham and cheese sticks brings immense joy and satisfaction. Not only do they fulfill our snack cravings, but they also offer a comforting embrace of flavor and nostalgia. Picture yourself enjoying these delightful bites during a movie night or catching up with friends—they’re perfect for every occasion.
By customizing them with your favorite ingredients, you can ensure that each recipe reflects your unique taste. Plus, preparing snacks at home is generally healthier and far more rewarding than store-bought options. So why not make your next gathering extra special with these delicious ham and cheese sticks? For more ideas on homemade snacks, check out resources like the Food Network or Taste of Home!
PrintHam and Cheese Sticks with Turkey Bacon: Easy Homemade Delight

Deliciously crisp ham and cheese sticks wrapped in turkey bacon, perfect for a quick snack or appetizer!
- Prep Time: 10 minutes
- Cook Time: 20 minutes
- Total Time: 30 minutes
- Yield: 4 servings
- Category: Appetizer
- Method: Baking
- Cuisine: American
- Diet: Low Carb
Ingredients
- 8 slices turkey bacon
- 8 ounces mozzarella cheese sticks
- 1 teaspoon garlic powder
- 1 teaspoon paprika
- Salt to taste
- 1 tablespoon olive oil
Instructions
- Preheat the oven to 400°F (200°C).
- Wrap each mozzarella cheese stick with a slice of turkey bacon.
- Place the wrapped sticks on a baking sheet.
- Drizzle with olive oil and sprinkle garlic powder, paprika, and salt.
- Bake in the oven for 15-20 minutes until the bacon is crispy.
- Serve hot and enjoy!
Notes
- For extra flavor, add some herbs.
- These can be served with a dipping sauce of your choice.
Nutrition
- Serving Size: 2 sticks
- Calories: 280
- Sugar: 1g
- Sodium: 600mg
- Fat: 22g
- Saturated Fat: 7g
- Unsaturated Fat: 12g
- Trans Fat: 0g
- Carbohydrates: 2g
- Fiber: 0g
- Protein: 20g
- Cholesterol: 50mg