
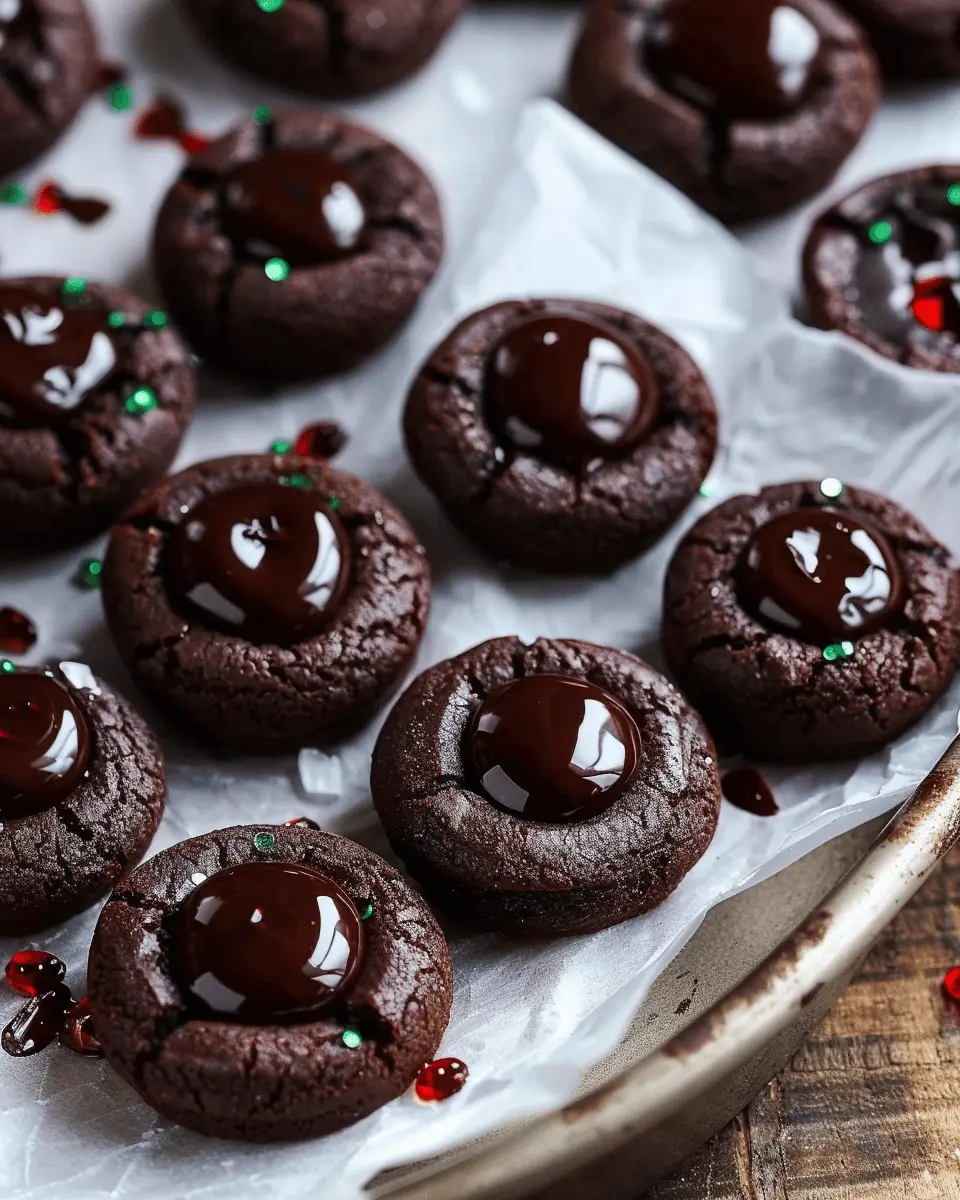
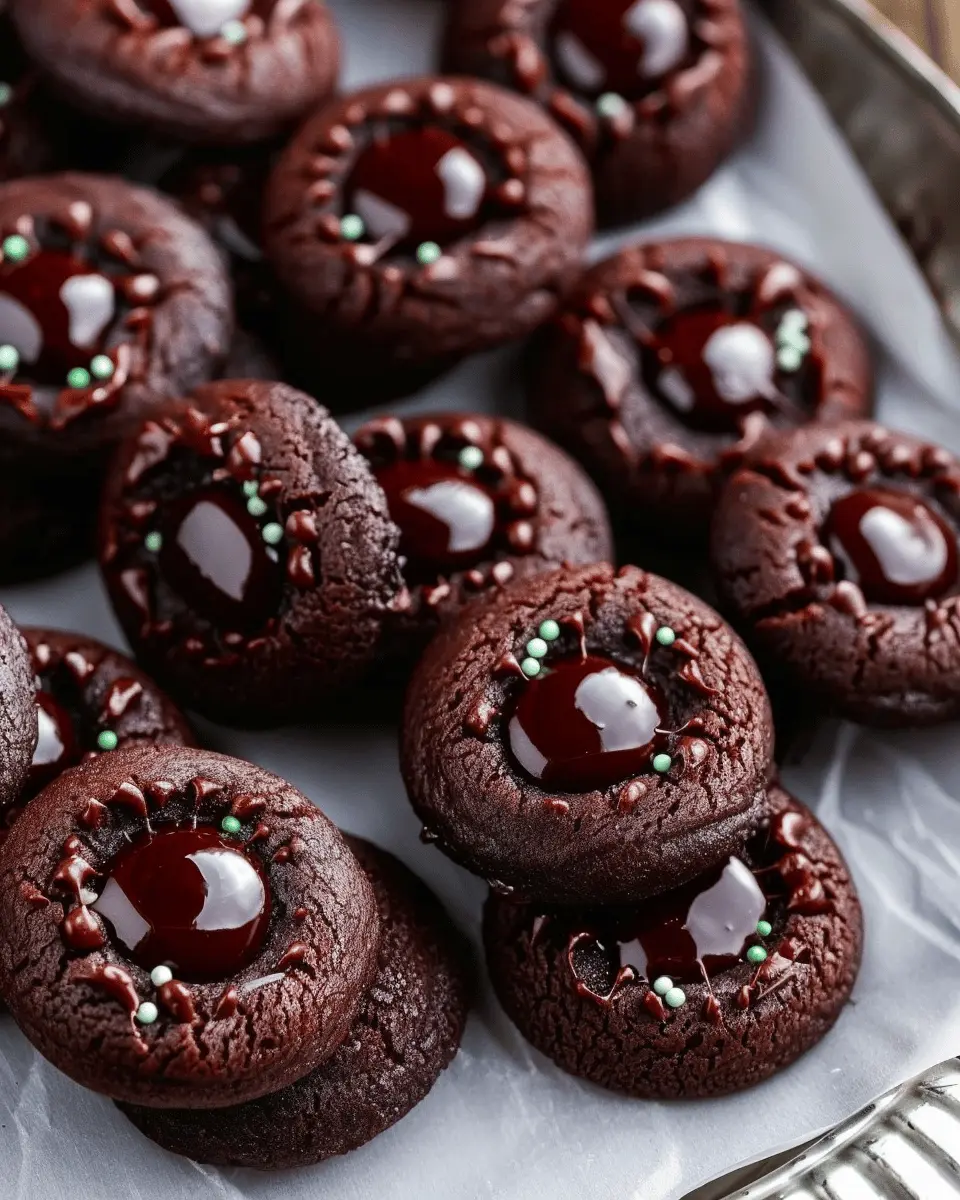
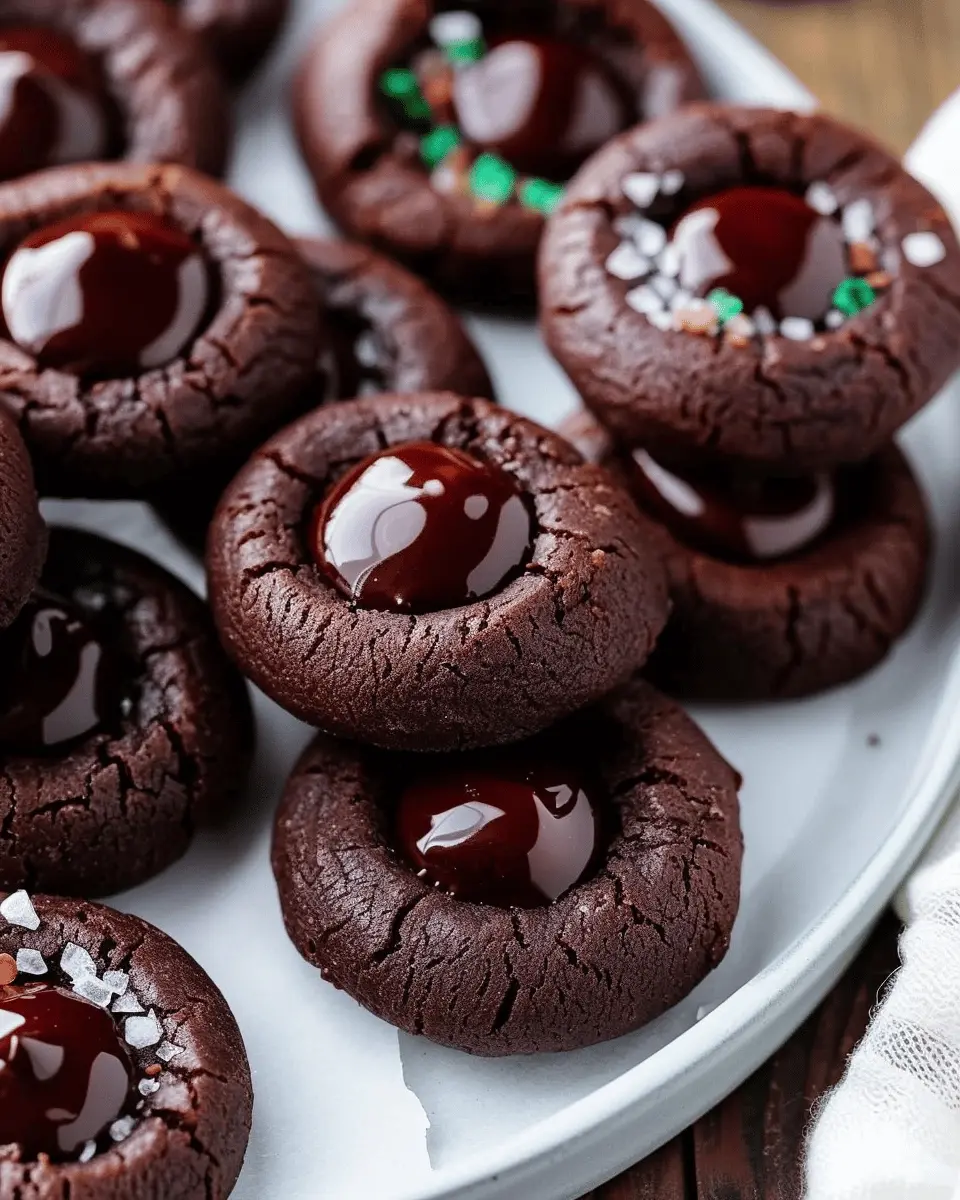
Introduction to Chocolate Thumbprint Cookies
When it comes to cookies, Chocolate Thumbprint Cookies hold a special place in many hearts. Bursting with rich chocolate flavor and a delightful surprise at the center, these cookies are not just a treat for your taste buds, but also a feast for the eyes. If you’ve ever savored the bliss of biting into a soft, chewy cookie that melts in your mouth, then you’re likely already familiar with why these cookies are so beloved.
What are Chocolate Thumbprint Cookies?
So, what exactly are these delightful cookies? Essentially, Chocolate Thumbprint Cookies are made from a rich chocolate dough that’s been pressed in the center, creating a little well ready to be filled. Traditionally, this well is filled with jam, but we can elevate it by using a luscious chocolate ganache or a light frosting. The contrast between the soft cookie and the sweet filling makes every bite a delicious experience.
These cookies are easy to make and perfect for any occasion, whether it’s a festive gathering or a casual coffee break with friends. They can even be customized by choosing different fillings or drizzles, allowing your creativity to shine. As an added perk, they also make for a fantastic gift—pack them up in a decorative box, and you’ve got a wonderful homemade present.
The Allure of Chocolate Thumbprint Cookies
One of the great things about Chocolate Thumbprint Cookies is their versatility. They can be both elegant and fun, making them suitable for everything from holiday parties to casual gatherings. You might even want to whip up a batch just to impress your colleagues during a busy work week!
Did you know that studies show chocolate can boost your mood? A little bit of chocolate in your life can make a difference, and enjoying these cookies could provide that gentle lift you need after a long day. If you’re looking for more ideas around chocolate treats, check out resources like the American Chocolate Manufacturing Association for inspiration.
Ready to dive into making your own Chocolate Thumbprint Cookies? Follow along as I share my favorite recipe that’s sure to impress your friends and satisfy your sweet tooth!
Ingredients for Chocolate Thumbprint Cookies
Creating delicious Chocolate Thumbprint Cookies starts with the right ingredients. Let’s break down what you’ll need to whip up a batch that’s sure to impress friends and family alike.
Essential ingredients for classic thumbprint cookies
To make the classic version of these delectable cookies, gather the following staples:
- All-purpose flour: This is the base of our cookies, providing structure.
- Cocoa powder: For that rich chocolate flavor, choose a high-quality unsweetened cocoa.
- Granulated sugar: Sweetness is key—make sure it’s well-measured for the perfect balance.
- Butter: Use unsalted butter to control the salt content.
- Egg: One large egg is all you need for binding.
These ingredients create a fudgy, melt-in-your-mouth texture that will keep everyone coming back for seconds!
Optional ingredients for a unique twist
Ready to elevate your Chocolate Thumbprint Cookies? Consider adding:
- Nuts: Chopped walnuts or pecans can add a nice crunch.
- Flavored extracts: Vanilla or almond extract adds depth to the flavor.
- Jams or ganache: Try unexpected fillings like raspberry jam or chocolate ganache for a delightful surprise.
Feel free to experiment with these optional ingredients! Who knows, you might just create your new favorite cookie recipe. For more on ingredient substitutions and cookie variations, check out resources like Serious Eats for expert tips!
Preparing Chocolate Thumbprint Cookies
Creating the perfect batch of Chocolate Thumbprint Cookies is both an art and a delight. This recipe guides you through an enjoyable baking process, transforming simple ingredients into a delicious treat. Let’s get started!
Gathering Your Ingredients
To make these delightful cookies, you’ll need to gather a few essential ingredients. Here’s what you should have ready:
- 1 cup all-purpose flour
- 1/3 cup unsweetened cocoa powder
- 1/2 teaspoon baking powder
- 1/4 teaspoon salt
- 1/2 cup unsalted butter, softened
- 1/2 cup granulated sugar
- 1/4 cup brown sugar, packed
- 1 teaspoon vanilla extract
- 1 large egg yolk
- Your choice of jam or chocolate for the filling (raspberry, strawberry, or chocolate ganache work beautifully)
As you can see, most of these ingredients are pantry staples, making this recipe surprisingly easy to whip up on a whim.
Mixing the Dry Ingredients
Start by mixing your dry ingredients. In a medium bowl, whisk together the all-purpose flour, cocoa powder, baking powder, and salt. This step ensures that the leavening agent is evenly distributed, which is crucial for ensuring your cookies rise evenly.
While whisking can sometimes feel tedious, it’s essential for achieving a great texture. For a detailed rundown on the science of baking, you can check out this insightful article on baking chemistry.
Creaming the Butter and Sugar
In a separate large bowl, you’ll want to cream the softened butter with the granulated sugar and brown sugar until you get a light and fluffy texture. This process infuses air into your mixture, which helps the cookies become soft and tender.
When creaming, use an electric mixer or a sturdy whisk if you want a workout. Just remember, it takes about 3-5 minutes of mixing, so don’t rush it! Once creamy, mix in the vanilla extract and egg yolk until fully combined.
Forming the Cookie Dough
Now it’s time to combine the wet and dry ingredients! Gradually add in the dry mix to your creamed butter and sugars. It’s best to fold it gently until just combined—overmixing can lead to denser cookies.
At this stage, you should notice your dough starting to come together. Use your hands to form the dough into a ball; it should be slightly sticky but manageable. If it feels too sticky, sprinkle in a tiny bit of flour until you get the desired consistency.
Creating the Thumbprint Indents
You’ll want to preheat your oven to 350°F (175°C) around this time. Now, scoop out tablespoon-sized portions of your dough and roll them into balls. Place them on a parchment-lined baking sheet, spaced about 2 inches apart.
This is where the fun begins! Gently press your thumb into the center of each dough ball, creating a well for the filling. It’s okay if the edges crack a little; they’ll bake out. This is an excellent opportunity to get creative—how deep you press controls how much jam goes in!
Baking the Cookies
Once you’re done shaping the cookies, if you’re using jam, fill the wells with your chosen flavor. For added indulgence, melt some chocolate and fill the wells instead—it’s a heavenly twist!
Pop the Chocolate Thumbprint Cookies in the preheated oven and let them bake for about 10-12 minutes. Keep an eye on them, as every oven is different. You want them to be set but still soft.
Once done, allow the cookies to cool on the baking sheet for a few minutes before transferring them to a wire rack. The scent wafting through your kitchen will be irresistible!
Follow these steps, and you’ll find yourself with a batch of Chocolate Thumbprint Cookies that will impress everyone. For a more in-depth look at cookie baking, consider checking resources like the Food Network. Happy baking!
Variations on Chocolate Thumbprint Cookies
Nutty Chocolate Thumbprint Cookies
If you’re a fan of that delightful crunch and rich flavor of nuts, then these Nutty Chocolate Thumbprint Cookies are calling your name! Simply fold in some finely chopped nuts—think walnuts, hazelnuts, or almonds—into the cookie dough. This addition not only enhances texture but also adds a nutty depth that pairs beautifully with the chocolate. For the filling, consider using a hazelnut chocolate spread or a creamy peanut butter for that extra layer of flavor that will have you coming back for more.
Spiced Thumbprint Cookies with a Kick
Looking to shake things up a bit? Spiced Thumbprint Cookies with a Kick brings warmth and excitement with a dash of cinnamon, ginger, or even a hint of cayenne pepper! The spices mingle perfectly with the chocolate, creating a cozy flavor profile that’s ideal for holiday gatherings or casual entertaining. For the filling, why not try a luscious spiced caramel sauce or even a berry jam with a hint of citrus? The combination of warm spices and sweet fillings not only indulges the senses but also creates an unforgettable taste experience.
No matter which variation you choose, these thumbprint cookies are versatile enough to fit every occasion. Plus, the beauty of Chocolate Thumbprint Cookies lies in their ability to be customized to your taste—so don’t be afraid to experiment! For more ideas on how to elevate your baking game, check out sources like the American Baking Guild for expert tips and tricks. Happy baking!
Baking notes for Chocolate Thumbprint Cookies
Common pitfalls and how to avoid them
Baking Chocolate Thumbprint Cookies can be a delightful experience, but a few common pitfalls can turn joy into frustration. Here are some tips to ensure your cookies come out perfectly every time:
-
Overmixing the dough: It’s tempting to keep mixing, especially if you’re eager to taste your creation! However, overmixing can lead to tough cookies. Mix just until the ingredients come together.
-
Room temperature ingredients: Using cold butter can lead to dough that’s too firm. Make sure your butter is softened at room temperature to achieve that melt-in-your-mouth texture.
-
Chilling the dough: Don’t skip the chilling step! Allowing the dough to rest in the fridge for at least 30 minutes helps maintain their shape while baking. A chilled dough prevents cookies from spreading too much.
-
Filling consistency: If your filling is too runny, it can ooze out during baking. A thicker filling will retain its shape better. Consider using room temperature jams or ganache.
For reliable baking techniques, visit King Arthur Baking for in-depth guides tailored for home bakers. Enjoy your baking!
Serving suggestions for Chocolate Thumbprint Cookies
Perfect pairings with beverages
When you’re indulging in Chocolate Thumbprint Cookies, the right beverage can elevate your experience to new heights. Try pairing these cookies with a steaming cup of freshly brewed coffee or rich hot chocolate. The warmth of these drinks complements the chocolatey goodness perfectly, creating a cozy atmosphere. If you’re more into tea, a spicy chai or smooth Earl Grey can enhance the flavors beautifully. You might even consider a cold glass of almond milk for a nutty twist that balances the sweetness of the cookies.
Presenting thumbprint cookies for special occasions
Planning a gathering? Presentation matters! Arrange your Chocolate Thumbprint Cookies on a decorative plate for a charming display. You can add a sprinkle of powdered sugar for a touch of elegance or place them in cupcake liners for an inviting look. Consider creating a dessert table with some fresh fruits or a cheese platter, adding an interesting contrast to these delectable cookies. Whether it’s a birthday, holiday, or just a casual get-together, these cookies are sure to impress and spark conversations about your culinary skills!
Feel free to explore more creative serving ideas on Food Network or Epicurious.
Tips for Making Perfect Chocolate Thumbprint Cookies
Ingredient Quality and Substitutions
When it comes to Chocolate Thumbprint Cookies, high-quality ingredients can make all the difference. Opt for unsweetened cocoa powder and real vanilla extract for a richer flavor profile. If you find yourself short on an ingredient, consider these substitutions:
- Butter: Use coconut oil for a dairy-free option.
- Flour: Whole wheat flour can add a nuttier flavor while maintaining structure.
- Sugar: Coconut sugar can be a healthier alternative with a similar sweetness.
For more insight on ingredient quality, check out this article that elaborates on how the right ingredients enhance cookie flavor.
Storing and Freezing Your Cookies
To keep your Chocolate Thumbprint Cookies fresh, store them in an airtight container at room temperature for up to a week. If you want to enjoy them later, freezing is a great option:
- Place the cooled cookies in a freezer-safe bag or container.
- Separate layers with parchment paper to avoid sticking.
- They can be frozen for up to three months!
When you’re ready to indulge, simply thaw at room temperature or warm them slightly in the oven for that freshly baked taste. For more tips on cookie storage, you might want to explore this guide.
Baking is not just a science; it’s an art! Enhance your Chocolate Thumbprint Cookies experience with these helpful tips, and share your results with friends—they’ll be impressed!
Time Details for Chocolate Thumbprint Cookies
Preparation Time
Making Chocolate Thumbprint Cookies is a delightful and satisfying process that takes about 20 minutes. This includes gathering your ingredients, mixing the dough, and chilling it slightly for the perfect texture.
Baking Time
Once you’re ready to bake, pop those lovely cookies in the oven for approximately 12-15 minutes. Keep an eye on them; you want them to be set but still soft in the center for that chewy goodness!
Total Time
In total, you can expect to spend around 40 minutes from start to finish. This means you can whip up a batch of these scrumptious cookies without sacrificing your entire evening. Just imagine the satisfying aroma wafting through your kitchen while enjoying some quality time, perhaps with a warm cup of tea or coffee.
For more tips on baking techniques, you might want to check out resources like America’s Test Kitchen or King Arthur Baking. Happy baking!
Nutritional Information for Chocolate Thumbprint Cookies
Estimated Calories
When indulging in Chocolate Thumbprint Cookies, portion control is key, as one cookie typically contains around 100-120 calories. This number can vary slightly based on the size of your cookies and the ingredients you use. If you’re looking for a sweet treat that fits into your daily caloric goals, these cookies are an enjoyable option.
Protein Content
For a better balance, these delightful cookies offer about 2 grams of protein each. While they aren’t high in protein, pairing them with a snack rich in protein can create a more satisfying experience. Consider enjoying them alongside a serving of Greek yogurt or even a handful of nuts to add a nutritional boost.
Dietary Considerations
Looking for dietary-friendly options? You’ll be pleased to know that Chocolate Thumbprint Cookies can easily be adjusted for various needs. For a gluten-free version, simply substitute traditional flour with almond or oat flour. Those with dairy intolerance might enjoy using plant-based chocolate in the recipe. Just ensure to check the labels! Many baking chocolate brands now offer options that cater to different dietary restrictions, such as dairy-free and vegan choices.
If you’re interested in more detailed nutritional insights, the USDA FoodData Central provides an excellent database. For tried-and-true gluten-free flour alternatives, you can find a wealth of options at sites like Bob’s Red Mill.
In summary, while Chocolate Thumbprint Cookies are a treat best enjoyed in moderation, you can definitely tailor them to suit your personal health and dietary preferences!
FAQs about Chocolate Thumbprint Cookies
How do I make thumbprint cookies thicker?
If you’re looking to achieve thicker Chocolate Thumbprint Cookies, there are a couple of straightforward tricks you can try. First, make sure your dough is adequately chilled before shaping your cookies. Chilling helps solidify the fats, preventing them from spreading too much in the oven. Additionally, you can increase the flour slightly—an extra couple of tablespoons can make a world of difference in the final thickness.
Can I use different types of chocolate fillings?
Absolutely! One of the delightful things about Chocolate Thumbprint Cookies is their versatility. While classic chocolate filling is delicious, feel free to experiment with other options. Nutella, white chocolate ganache, or even raspberry jam can add a fun twist to your cookies. It’s all about personal preference, so don’t hesitate to get creative! If you’re unsure, start with a small batch to test out your filling choices.
What’s the best way to store thumbprint cookies?
Storing your Chocolate Thumbprint Cookies properly ensures they stay fresh and delicious. For short-term storage, place the cookies in an airtight container at room temperature. They typically last for about a week. If you want to keep them longer, consider freezing them. Just be sure to separate layers with parchment paper and place them in a freezer-safe bag. When you’re ready to enjoy them, let them thaw at room temperature for optimal taste and texture.
If you’re curious about more about cookie storage and freshness, check out resources like Serious Eats for detailed guidance on preserving your baked goods. Happy baking!
Conclusion on Chocolate Thumbprint Cookies
Recap of why these cookies are a must-try
In a world brimming with dessert options, Chocolate Thumbprint Cookies stand out for their irresistible blend of textures and flavors. The rich chocolate cookie coupled with a luscious filling makes for a delightful treat that’s perfect for any occasion.
What makes these cookies truly special is their versatility; whether you’re hosting a gathering, or simply indulging after a long day, they never disappoint. Plus, they’re easy to make, inviting you into the joy of baking with minimal fuss. So, why wait? Treat yourself and your loved ones to a batch of these heavenly cookies. Enjoy experimenting with your favorite fillings, and don’t forget to share your delightful creations!
For more delicious baking inspiration, check out resources from King Arthur Baking or The Kitchn. Happy baking!
PrintChocolate Thumbprint Cookies: Easy Indulgence for Home Bakers

Discover how to make delicious chocolate thumbprint cookies that are sure to impress your friends and family.
- Prep Time: 15 minutes
- Cook Time: 12 minutes
- Total Time: 27 minutes
- Yield: 24 cookies
- Category: Dessert
- Method: Baking
- Cuisine: American
- Diet: Vegetarian
Ingredients
- 1 cup all-purpose flour
- 1/2 cup unsweetened cocoa powder
- 1/2 teaspoon baking powder
- 1/4 teaspoon salt
- 1/2 cup unsalted butter, softened
- 1/2 cup granulated sugar
- 1/4 cup brown sugar, packed
- 1 teaspoon vanilla extract
- 1 large egg
- 1/2 cup chocolate chips
Instructions
- Preheat the oven to 350°F (175°C) and line a baking sheet with parchment paper.
- In a bowl, whisk together the flour, cocoa powder, baking powder, and salt.
- In another bowl, cream the butter, granulated sugar, and brown sugar together until light and fluffy.
- Add the vanilla extract and egg to the butter mixture, mixing well.
- Gradually add the dry ingredients to the wet mixture, stirring until combined.
- Roll dough into 1-inch balls and place them on the prepared baking sheet.
- Make an indentation in the center of each ball with your thumb.
- Fill each indentation with a few chocolate chips.
- Bake for 10-12 minutes, then allow to cool before serving.
Notes
- Allow the cookies to cool completely before storing.
- These cookies can be stored in an airtight container for up to a week.
Nutrition
- Serving Size: 1 cookie
- Calories: 100
- Sugar: 10g
- Sodium: 50mg
- Fat: 5g
- Saturated Fat: 3g
- Unsaturated Fat: 2g
- Trans Fat: 0g
- Carbohydrates: 12g
- Fiber: 1g
- Protein: 1g
- Cholesterol: 15mg