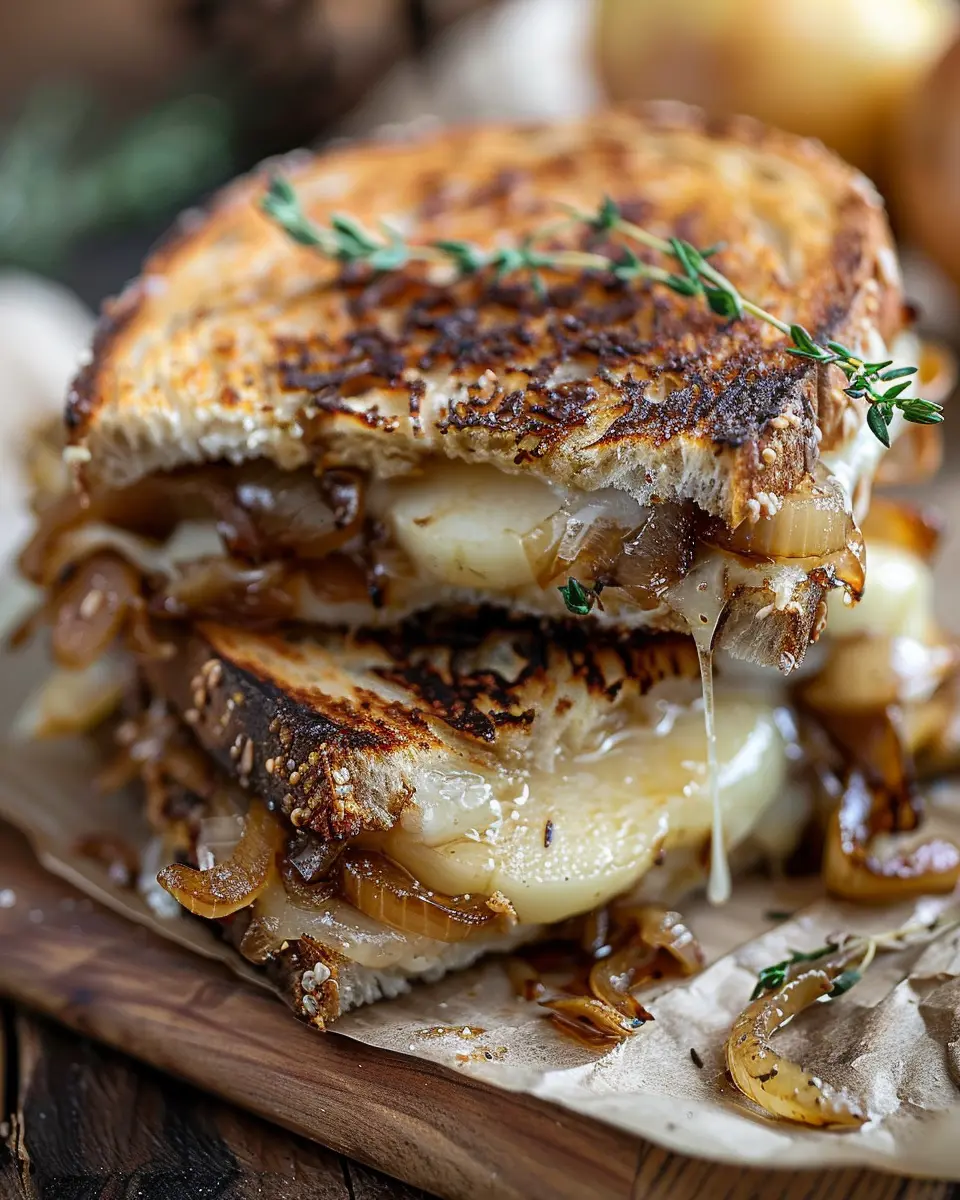
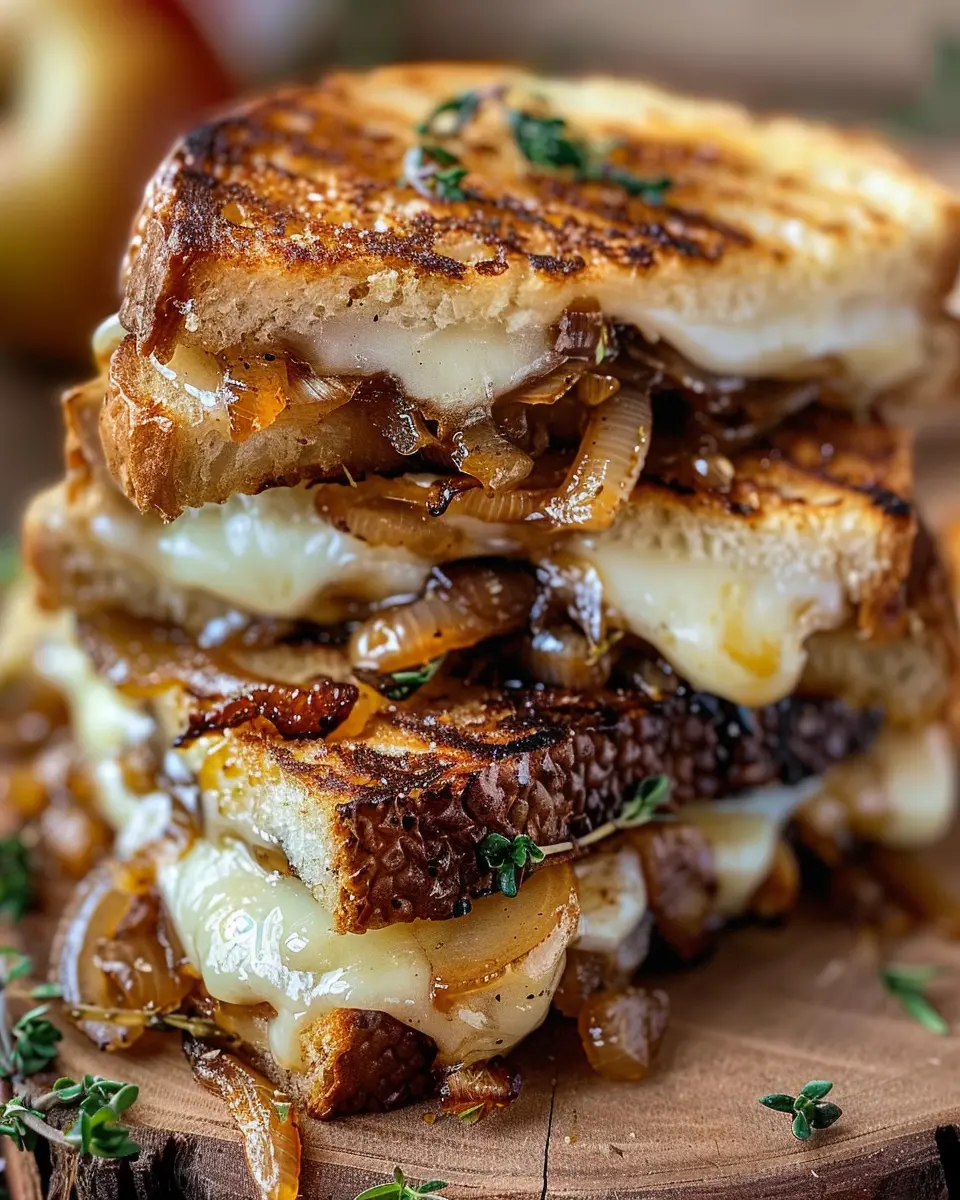
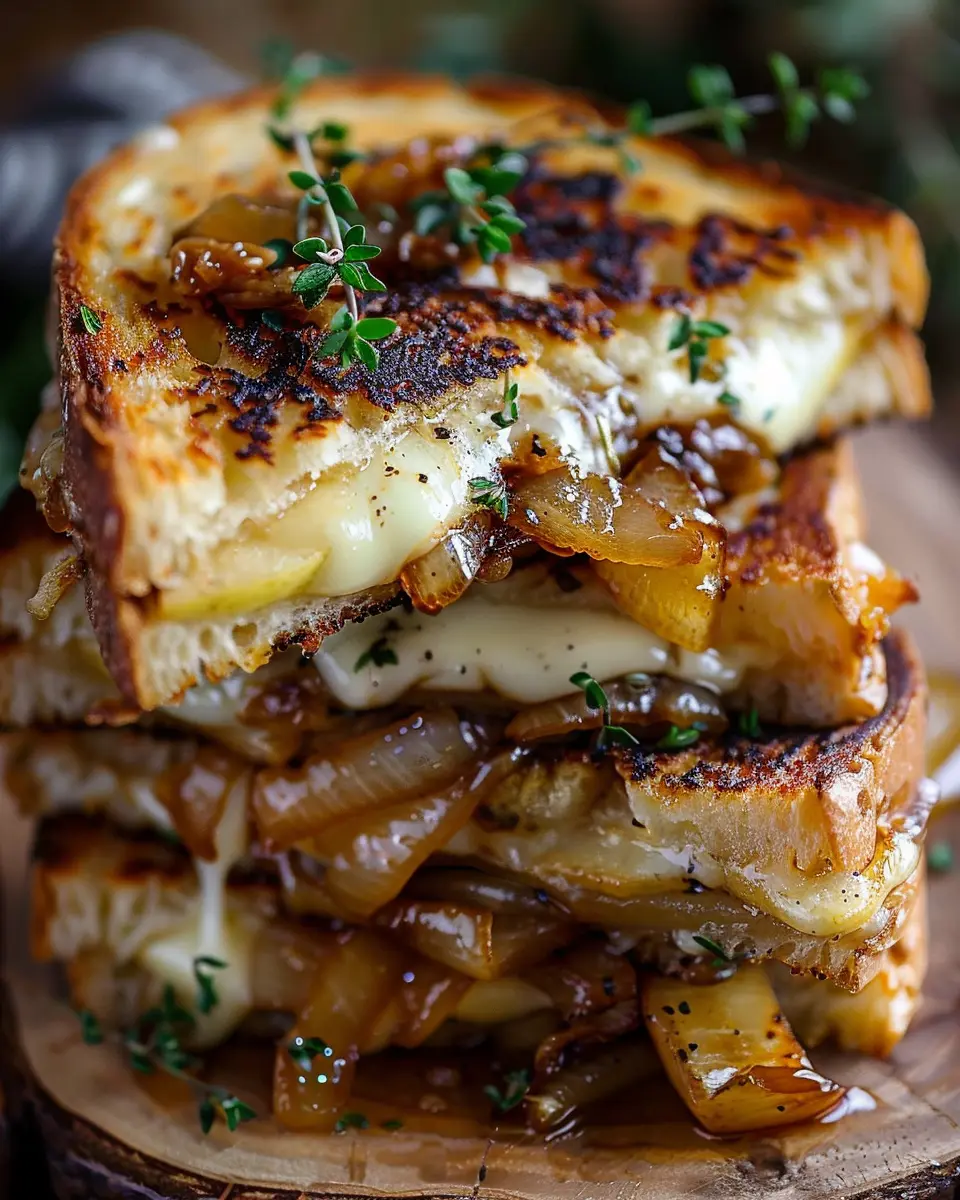
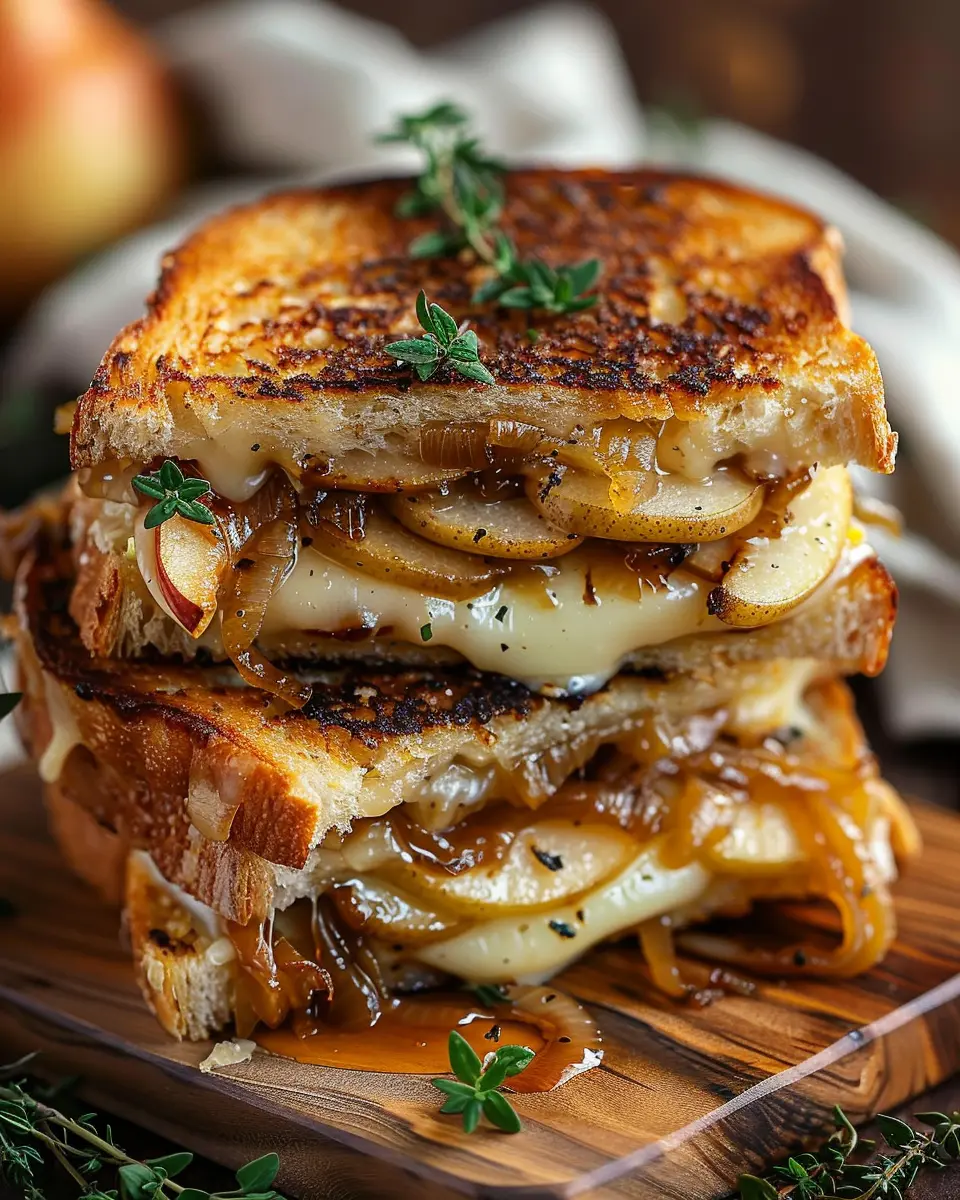
Introduction to Pear & Apple Grilled Cheese
When you think of comfort food, what comes to mind? For many, grilled cheese sandwiches evoke nostalgic memories of rainy days, cozy couches, and childhood lunches. Now, imagine elevating that classic dish by adding in the delightful flavors of fresh pears and apples. Enter the pear apple grilled cheese! This innovative take on a traditional favorite balances creamy cheese with the sweetness of fruit, creating a mouthwatering explosion of flavors that’s perfect for any occasion.
Why Pear & Apple Grilled Cheese is the Perfect Comfort Food
Combining the crunch of apples and the softness of pears with melted cheese creates a textural paradise. Here’s why this delectable sandwich is at the top of my comfort food list:
-
Flavor Complexity: The sweet and tart notes from the fruits contrast beautifully with the savory goodness of melted cheese. Plus, when you add caramelized onions, there’s an extra layer of depth that creates an irresistible umami experience.
-
Nutritional Benefits: Did you know that pears and apples are rich in dietary fiber and vitamin C? Including these fruits in your grilled cheese not only enhances taste but also gives you a nutritious boost. Who said comfort food couldn’t be good for you?
-
Versatility: This pear apple grilled cheese is adaptable to your tastes. Prefer turkey bacon over traditional meats? Want to swap in chicken ham? Feel free to mix and match ingredients! You can even modify it for vegetarians by omitting the meat altogether.
Imagine enjoying this delightful sandwich during a post-work chill session or serving it at a casual gathering with friends. It’s a dish that suits both solo dining and social events seamlessly. Interested in the perfect pairing? Try washing it down with a refreshing cup of herbal tea or a sparkling fruit-infused drink to complement the sweet and savory flavors.
So, are you ready to dive into this innovative spin on a classic? Your taste buds will thank you, and you may just find a new favorite in this warm, cheesy, and downright comforting pear apple grilled cheese. Stay tuned for the full recipe to make this delicious sandwich at home!
Ingredients for Pear & Apple Grilled Cheese
Essential Ingredients for Success
Creating the perfect pear apple grilled cheese starts with selecting quality ingredients. Here’s what you will need:
- Bread: Choose a hearty bread like sourdough or whole grain for that perfect crunch.
- Cheese: A melty cheese like sharp cheddar or gouda enhances the flavors beautifully.
- Fruits: Fresh, ripe pears and crisp apples are essential for that sweet tang.
- Onions: Sweet onions caramelized to perfection add depth and richness to each bite.
- Butter: Use unsalted butter for grilling to achieve that golden, crispy exterior.
Optional Add-ins for Extra Flavor
Looking to jazz things up? Consider these add-ins for your pear apple grilled cheese:
- Turkey Bacon: Crisp it up for a savory crunch.
- Chicken Ham: Adds protein while keeping the sandwich light.
- Nuts: A sprinkle of toasted walnuts or pecans can add a delightful crunch.
- Spices: Cinnamon or nutmeg can elevate the sweetness of the fruits.
By including these ingredients, you’ll create a grilled cheese that’s not just a meal but a delightful experience. Want to dive deeper into gourmet grilled cheese? Check out this guide on artisanal cheeses that can take your cooking to the next level!
Preparing the Pear & Apple Grilled Cheese
Creating a delightful pear apple grilled cheese sandwich is not just about tossing ingredients together; it’s an art that involves balancing flavors and textures to create a mouthwatering masterpiece. This section will guide you through the preparation process, ensuring that each bite delivers a symphony of sweetness and savory goodness.
Caramelizing the Onions
Before we get to the fun stuff, let’s start with the foundation of flavor: caramelized onions. The beauty of caramelizing onions lies in their ability to elevate any dish with their deep, rich flavor. Here’s how to do it:
-
Ingredients Needed:
-
1 large onion, thinly sliced
-
2 tablespoons of olive oil or butter
-
A pinch of salt
-
Instructions:
- Heat the olive oil or butter in a skillet over medium heat.
- Add the sliced onions and a pinch of salt. The salt helps draw out moisture, leading to perfectly tender onions.
- Stir occasionally, allowing the onions to cook for about 15–20 minutes. You want them to turn a beautiful golden brown color; patience is key!
- For an extra touch, add a sprinkle of balsamic vinegar towards the end for a tart complexity.
Caramelized onions not only add sweetness but also depth to your pear apple grilled cheese. If you want to learn more tips on perfect caramelization, check out this helpful guide.
Preparing the Bread and Cheese Layers
With your onions caramelized, it’s time to focus on the stars of the show: the bread and cheese. Choosing the right ingredients is crucial for the perfect sandwich.
-
Ingredients Needed:
-
2 slices of sturdy bread (sourdough or whole grain works beautifully)
-
1/2 cup of sliced apple (your choice, but Granny Smith or Honeycrisp are excellent)
-
1/2 cup of sliced pear (Bartlett or Anjou)
-
1 cup of cheese (Gruyère or sharp cheddar for a flavor punch)
-
Instructions:
- Lay out your two slices of bread, ready for assembly.
- Start with cheese as the base on both slices—it helps in holding everything together.
- Layer the sliced pear and apple atop the cheese, followed by a generous spoonful of your caramelized onions.
- Top with more cheese for that gooey texture we all crave!
This creative layering brings together a delightful blend of flavors that makes your pear apple grilled cheese uniquely satisfying.
Assembling the Sandwich
Now comes the fun part—putting it all together! Assembly is key to ensuring that each bite is flavorful.
- Place one cheese-covered slice of bread on your work surface.
- Add the apple, pear, and caramelized onion layers.
- Top it off with the second slice of cheese-covered bread.
- Gently press down to ensure everything sticks together.
A well-constructed sandwich means you won’t have a mess on your hands once you start grilling!
Grilling to Golden Perfection
Let’s take this pear apple grilled cheese to the grill—an essential step that’s just as important as the previous ones.
- Instructions:
- Heat a non-stick skillet or griddle over medium heat.
- Melt a tablespoon of butter or use a drizzle of olive oil—this adds flavor and ensures a crispy crust.
- Place your assembled sandwich in the skillet and grill for 3–4 minutes on each side. Look for a gorgeous, golden brown crust.
- Don’t rush this process; patience will yield a sandwich with melty cheese and perfectly toasted bread.
If the sandwich is browning too quickly, lower your heat. Remember, you want that cheese to melt beautifully!
Serve and Enjoy
Once your sandwich has reached that golden perfection, it’s time to serve. Cut the sandwich in half, and arrange it on a plate. You might want to pair it with a light salad or some homemade soup for a full meal experience.
Dig in and savor each bite! The combination of sweet pear and apple, caramelized onions, and melt-in-your-mouth cheese creates an unforgettable flavor explosion. Whether you’re enjoying this for lunch or dinner, each bite will remind you why grilled cheese is a timeless comfort food. Bon appétit!
Variations on Pear & Apple Grilled Cheese
If you’re as obsessed with the pear & apple grilled cheese combination as I am, you’re in for a treat! Let’s explore a few delicious variations to keep things interesting.
Spicy Pear & Apple Grilled Cheese
For those who love a little kick, try adding jalapeño slices or a drizzle of sriracha to your grilled cheese. The spicy notes balance beautifully with the sweetness of the pears and apples, creating an unforgettable flavor contrast. Pair it with a cool avocado salad for a refreshing side. Trust me, this twist will redefine your lunch game!
Nutty Pear & Apple Grilled Cheese
If you’re a fan of crunch, this variation is calling your name. Sprinkle some crushed walnuts or slivers of almond into the mix. The nutty flavors complement the sweetness of your fruit, while adding an enjoyable texture that elevates your pear apple grilled cheese. You could also swirl in a bit of nut butter—just be mindful of the balance to avoid overpowering the delicate fruit flavors. This nutty melody is perfect for an upscale but easy-to-make weekday meal.
Vegan Pear & Apple Grilled Cheese
Going plant-based? No problem! Use vegan cheese and buttery avocado instead of regular cheese. You might even consider a light spread of hummus for added creaminess. This version not only tastes incredible but is also packed with nutrients. Serve it with a tomato basil soup for a comfort food combo that’s vegan-approved!
Incorporating these variations will not only keep your mealPrep exciting but will also impress any friends popping over for lunch. Want more ideas? Check out resources like Food Network or Serious Eats for inventive variations on classic recipes!
Cooking Tips and Notes for Pear & Apple Grilled Cheese
Tips for Perfectly Caramelized Onions
Caramelizing onions may seem daunting, but it’s easier than you think! Here are some tips to help you achieve those golden, sweet results:
- Low and Slow: Cook your onions on low heat for about 20-30 minutes. This allows the natural sugars to develop fully, bringing out a rich flavor.
- Use the Right Pan: A heavy skillet, like cast iron, spreads heat evenly and can help caramelize the onions more thoroughly.
- Don’t Rush: It’s tempting to crank up the heat, but trust the process! A little patience goes a long way.
For more refinement on this technique, check out this onion caramelization guide.
Choosing the Right Bread
The bread is crucial for your pear apple grilled cheese. Look for:
- Sourdough or Artisan Bread: The tanginess complements the sweetness of the apples and pears beautifully.
- Whole Grain Option: If you’re feeling healthy, whole grain bread adds fiber and flavor.
- Freshness Counts: Always opt for freshly baked if possible; it makes a significant difference in texture and taste.
Mixing flavors can elevate your pear apple grilled cheese to the next level! Consider a side of dipping sauce, such as a tangy balsamic reduction or a simple apple chutney, for added zest. These little touches show your guests you really care!
Serving Suggestions for Pear & Apple Grilled Cheese
Ideal Sides to Complement Your Sandwich
When serving your pear and apple grilled cheese, consider pairing it with sides that enhance its unique flavors. A fresh arugula salad with a light lemon vinaigrette will cut through the creaminess of the cheese while highlighting the sweetness of the fruit. Alternatively, sweet potato fries offer a delightful contrast, bringing a bit of crispiness and earthiness to the meal. If you’re feeling adventurous, try some roasted butternut squash: its nuttiness complements the sandwich beautifully.
Creative Dipping Sauces
Elevate your dining experience with some creative dipping sauces for your pear apple grilled cheese. Think about a tangy balsamic reduction that adds a rich, sweet layer when dipped. If you prefer something with a bit of heat, a chipotle aioli could be just the thing to kick it up a notch! For those who love a classic combo, a side of apple cider vinaigrette can add that perfect tanginess to each bite.
For more inspiration, check out these delicious side recipes from Food Network and Serious Eats. Your friends will be wondering how you came up with such a gourmet meal!
Time Breakdown for Pear & Apple Grilled Cheese
Preparation Time
Getting started with your pear apple grilled cheese is a breeze! Dedicate about 10–15 minutes to gather your ingredients and slice your pears and apples. Don’t forget to chop your onions for caramelizing—they add that irresistible sweetness!
Cooking Time
Once you’re ready to cook, it should take approximately 15–20 minutes. This includes caramelizing your onions until they’re golden brown and toasting your sandwich just right. Remember, patience is key for achieving that perfect melt!
Total Time
In total, you’re looking at around 30–35 minutes from start to finish. This is the kind of recipe that not only fills your belly but also warms your heart. Want to make it faster? Consider prepping the onions ahead of time and enjoy a relaxing culinary experience! For more tips on meal prepping, check out sites like Serious Eats.
Nutritional Facts for Pear & Apple Grilled Cheese
When you whip up a delicious pear apple grilled cheese with caramelized onions, it’s not just a feast for your taste buds; it’s also a nutritious choice! Here’s a quick breakdown of the nutritional profile:
Calories
One serving of this delightful sandwich typically contains around 300 calories. This makes it a great option for lunch or a light dinner, providing nourishment without weighing you down.
Fat
With approximately 15 grams of fat per serving, mainly from cheese and butter, this sandwich balances indulgence with flavor. Opting for lower-fat cheese can be a smart way to reduce fat content while still enjoying the creamy texture.
Carbohydrates
You can expect around 30 grams of carbohydrates in each serving, coming primarily from the bread and fruit. This makes it a satisfying meal that fuels your day—a perfect combination of complex carbs and fiber found in the fruits.
For more information on nutritious eating, check out articles from Nutrition.gov or Eatright.org. Enjoy creating your pear apple grilled cheese and savor the delightful blend of flavors!
FAQs about Pear & Apple Grilled Cheese
What can I use if I don’t have sharp cheddar cheese?
If you find yourself without sharp cheddar cheese, don’t worry! There are plenty of alternatives that can still give your pear apple grilled cheese that creamy and flavorful kick. Consider using:
- Gruyère: This Swiss cheese melts beautifully and offers a nutty flavor that pairs well with fruit.
- Havarti: Another great melting cheese, Havarti adds a buttery taste that complements the sweetness of the pears and apples.
- Monterey Jack: Mild and smooth, this cheese can provide a lovely creaminess without overpowering the other ingredients.
Can I make this sandwich in the oven?
Absolutely! If you prefer an oven method, you can certainly bake your pear apple grilled cheese. Here’s how:
- Preheat your oven to 375°F (190°C).
- Assemble your sandwich and place it on a baking sheet.
- Bake for about 10-15 minutes, flipping halfway through, until the bread is golden and the cheese has melted.
This method allows for even cooking and is a great option if you’re making multiple sandwiches at once!
How do I store leftovers?
If you have any delicious leftovers, storing them properly can help maintain the flavor and texture. Here’s what to do:
- Fridge: Wrap the grilled cheese tightly in plastic wrap or aluminum foil and store in an airtight container. It should keep for about 2-3 days.
- Reheating: For the best results, use a skillet over medium heat to reheat your sandwich, allowing the cheese to melt evenly while crisping the bread.
By following these tips, you can enjoy your pear apple grilled cheese even after it’s been made!
For more culinary inspiration, check out this article on perfecting grilled cheese techniques.
Conclusion on Pear & Apple Grilled Cheese
As we wrap up this delightful recipe for pear apple grilled cheese with caramelized onions, remember that creativity is the heart of cooking! Feel free to experiment with different cheeses, like a tangy goat cheese or a sharp cheddar, to elevate your dish.
Consider adding your favorite proteins, such as turkey bacon or chicken ham, for extra flavor. Cooking is all about finding your personal touch. After all, every great chef started just like you—exploring, tasting, and tweaking recipes to fit their style. So grab those ingredients and let your culinary imagination run wild! For more inspiration, check out resources from Food Network and Bon Appétit. Happy grilling!
PrintPear Apple Grilled Cheese with Caramelized Onions: A Delightful Twist
A delicious take on the classic grilled cheese with the sweet and savory combination of pear and apple paired with caramelized onions.
- Prep Time: 10 minutes
- Cook Time: 10 minutes
- Total Time: 20 minutes
- Yield: 1 sandwich
- Category: Sandwich
- Method: Grilling
- Cuisine: American
- Diet: Vegetarian
Ingredients
- 2 slices of bread
- 1 pear, thinly sliced
- 1 apple, thinly sliced
- 1/2 cup cheese (your choice)
- 1 onion, caramelized
- 2 tablespoons butter
Instructions
- Heat a skillet over medium heat.
- Spread butter on one side of each slice of bread.
- Place one slice of bread, butter-side down, in the skillet.
- Add cheese, pear, apple, and caramelized onions on top.
- Cover with the second slice of bread, butter-side up.
- Cook until golden brown and the cheese is melted, flipping halfway through.
Notes
- Serve warm for best flavor.
- Feel free to experiment with different cheeses.
Nutrition
- Serving Size: 1 sandwich
- Calories: 350
- Sugar: 10g
- Sodium: 500mg
- Fat: 20g
- Saturated Fat: 10g
- Unsaturated Fat: 5g
- Trans Fat: 0g
- Carbohydrates: 30g
- Fiber: 3g
- Protein: 15g
- Cholesterol: 30mg