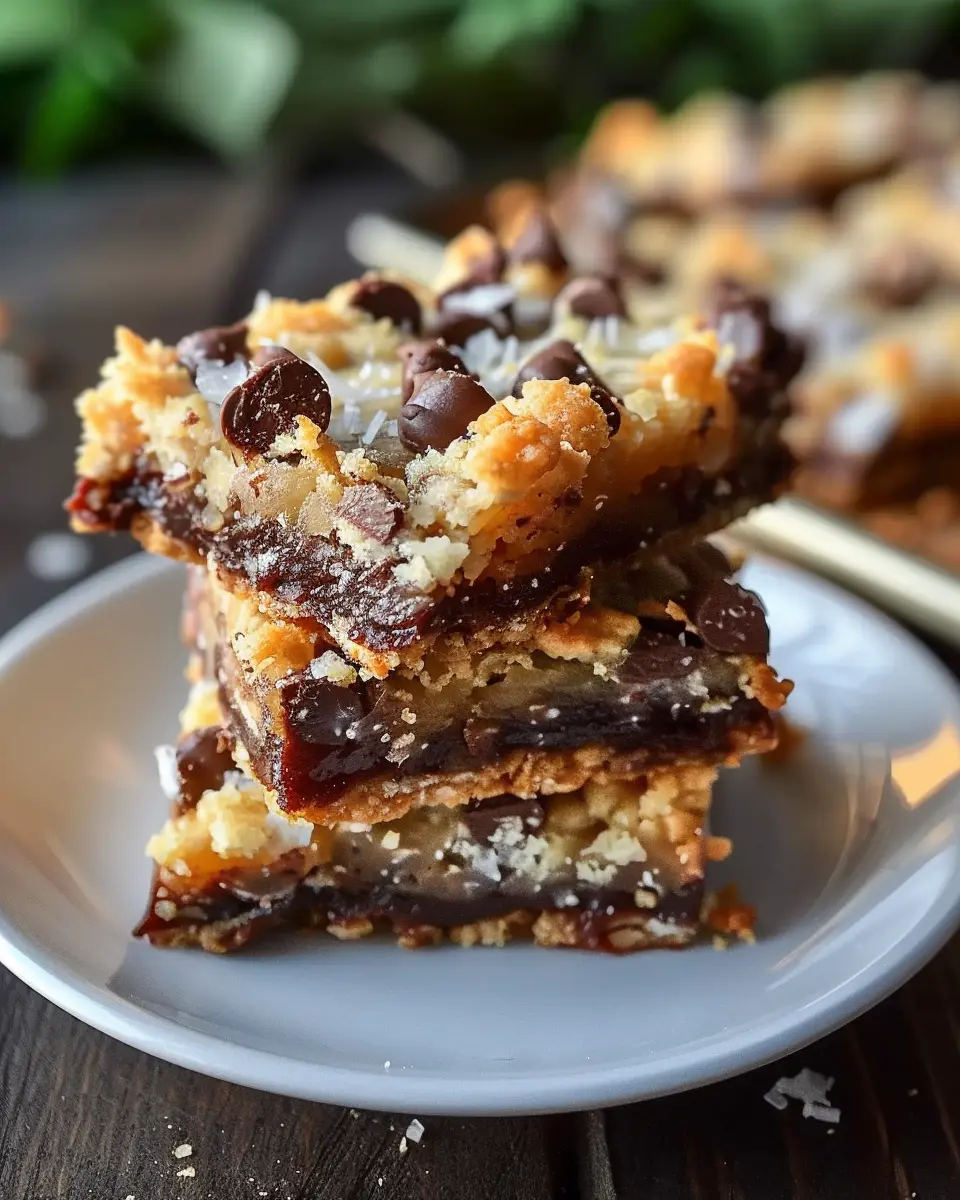
Introduction to 7 Layer Bars
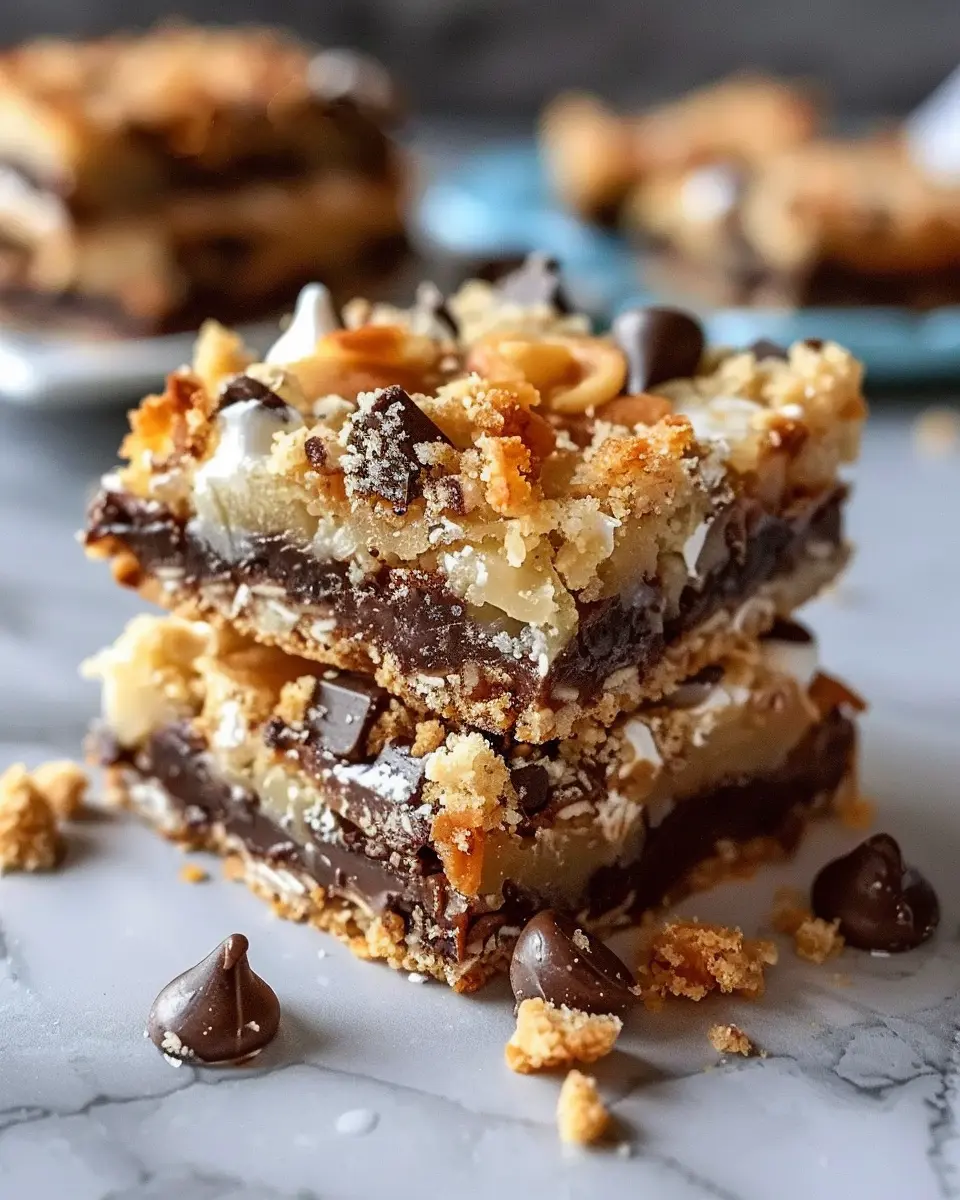
If you haven’t yet encountered the delight that is 7 Layer Bars, you’re in for a treat! These indulgent little squares are a dessert lover’s dream, combining a medley of flavors and textures that will make your taste buds dance. Known affectionately as Magic Cookie Bars, they encompass seven layers of deliciousness—from a buttery graham cracker crust to a drizzle of rich chocolate.
What Are 7 Layer Bars and Why Are They Called Magic Cookie Bars?
So, what exactly are these 7 layer bars? At their core, they start with a simple base of crushed graham crackers mixed with melted butter, creating a crunchy foundation. From there, the magic unfolds:
- Sweetened condensed milk: This golden nectar is poured over the layers, holding everything together.
- Chocolate chips: A sprinkle of semi-sweet or milk chocolate offers that rich chocolaty goodness.
- Coconut shreds: You can’t have a magic bar without the tropical flair of coconut, adding a chewy texture.
- Chopped nuts: Pecans or walnuts add that nutty crunch we all crave.
- Additional toppings: Feel free to get creative with extras like caramel, peanut butter chips, or even dried fruit!
The reason these bars are often referred to as “magic” lies in the seamless blending of flavors and textures—not to mention the ease with which they come together. It’s as simple as layering the ingredients in a pan, baking, and slicing when cool!
This dessert has made its rounds in American kitchens for decades and has become a staple at potlucks and family gatherings. In fact, according to a survey by the American Baking Society, over 60% of home bakers have tried these while entertaining guests!
Are you ready to impress your friends with a batch of these heavenly bars? With their striking appearance and delightful taste, these 7 layer bars might just become your go-to dessert. Plus, experimenting with variations can lead to fun conversation starters! So let’s dive into the recipe and create some magic in the kitchen together.
Ingredients for 7 Layer Bars
When it comes to crafting the perfect 7 layer bars, gathering the right ingredients is key! These bars are a delightful combination of flavors and textures that will leave your friends and family wanting more. Here’s what you’ll need for this easy yet scrumptious recipe:
- Graham Cracker Crumbs: About 1 ¾ cups, serving as the base layer.
- Unsalted Butter: Melted, approximately ½ cup, to bind the crust together.
- Sweetened Condensed Milk: One 14-ounce can, a rich addition that creates a gooey texture.
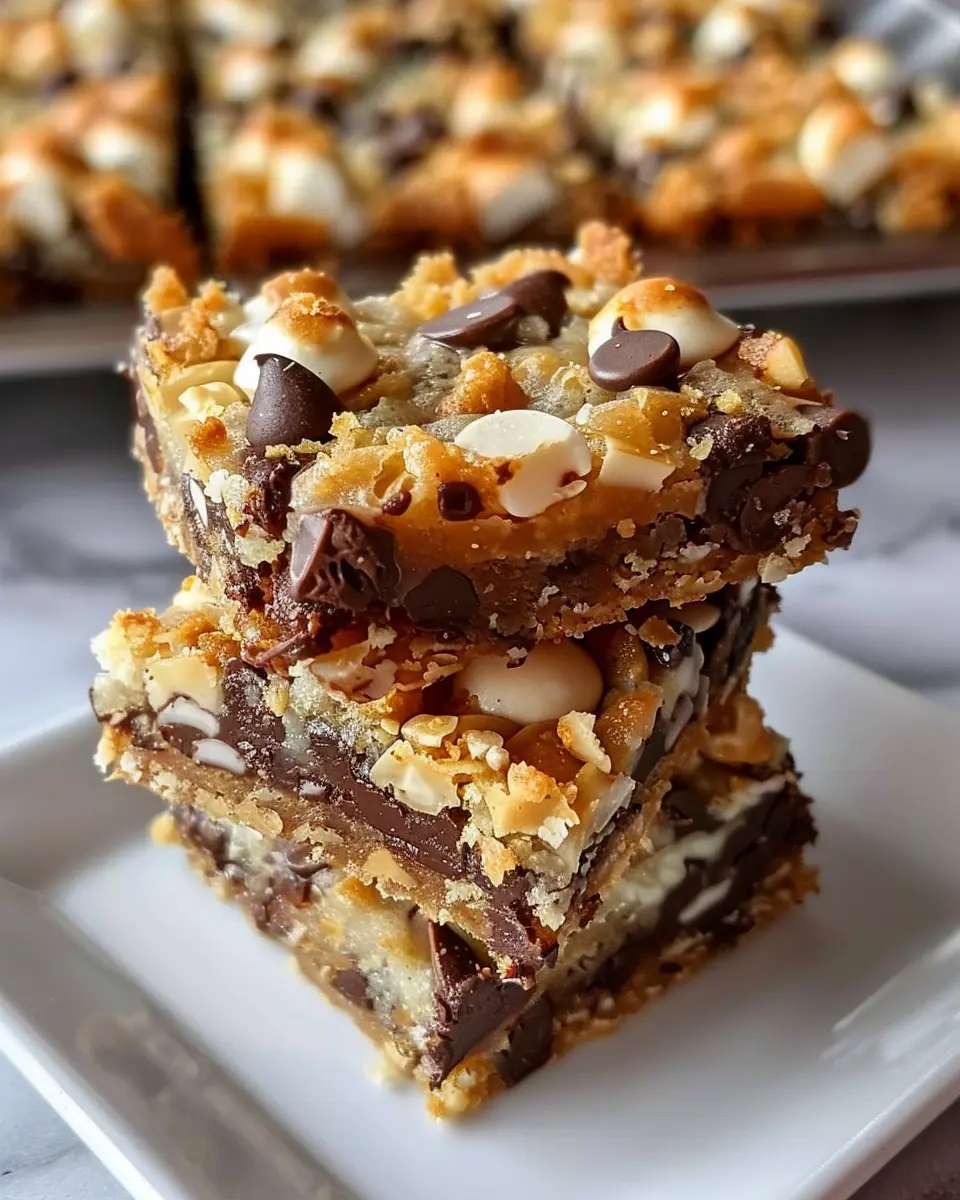
- Chocolate Chips: Roughly 1 cup of semi-sweet or milk chocolate chips, your choice!
- Butterscotch Chips: Another cup for a sweet contrast to the chocolate.
- Shredded Coconut: About 1 cup, adding a tropical flair.
- Chopped Nuts: ½ cup of pecans or walnuts for that delightful crunch.
Once you have these ingredients, you’re on your way to baking divine 7 layer bars that truly live up to their “magic” name. For some tips on how to optimize the flavor, check out Baker’s Tips for more insights!
Ready to dive into baking? You won’t regret it!
Step-by-step Preparation of 7 Layer Bars
If you’re looking for a delightful treat that’s both simple and scrumptious, then the 7 layer bars—often called magic cookie bars—are your answer. With their layers of textures and flavors, these bars have a little something for everyone. Let’s break down the steps to whip up this fan-favorite dessert.
Gather your ingredients
The first thing you’ll want to do is collect all your ingredients. Having everything on hand makes the process smoother and much more enjoyable. Here’s what you’ll need:
- 1 ½ cups of graham cracker crumbs
- ½ cup of unsalted butter
- 1 cup of sweetened shredded coconut
- 1 cup of chocolate chips (semi-sweet or dark, depending on your preference)
- 1 cup of chopped nuts (like pecans or walnuts)
- 1 cup of butterscotch chips
- 1 can (14 ounces) of sweetened condensed milk
You might even find some interesting facts about the origins of some of these ingredients on sites like Food History or The Spruce Eats that can add to your understanding and enjoyment of this recipe!
Prepare the baking pan
Next up, let’s set the stage for the baking magic! Preheat your oven to 350°F (175°C). Grab a 9×13 inch baking dish and line it with parchment paper; this not only helps with easy removal but also makes cleanup a total breeze. After all, who likes scrubbing burnt edges off pans? Lightly grease the parchment with some spray oil to make sure everything comes out perfectly.
Make the buttery graham cracker base
In a mixing bowl, combine the 1 ½ cups of graham cracker crumbs with the ½ cup of melted unsalted butter. Stir this mixture until the crumbs are well-coated. Using a spatula, press the crumb mixture evenly into the bottom of your prepared baking pan. This buttery layer serves as the solid foundation for your 7 layer bars, giving them their delightful crunch.
Layer on the delicious toppings
Now, for the fun part—layering! Here’s where you can really customize your 7 layer bars. Start with:
- A generous sprinkle of shredded coconut.
- Sprinkle the chocolate chips evenly on top.
- Add your chopped nuts.
- Finally, top it off with butterscotch chips.
Feel free to mix and match based on your taste! Love almonds? Toss them in instead of walnuts.
Pour the sweetened condensed milk
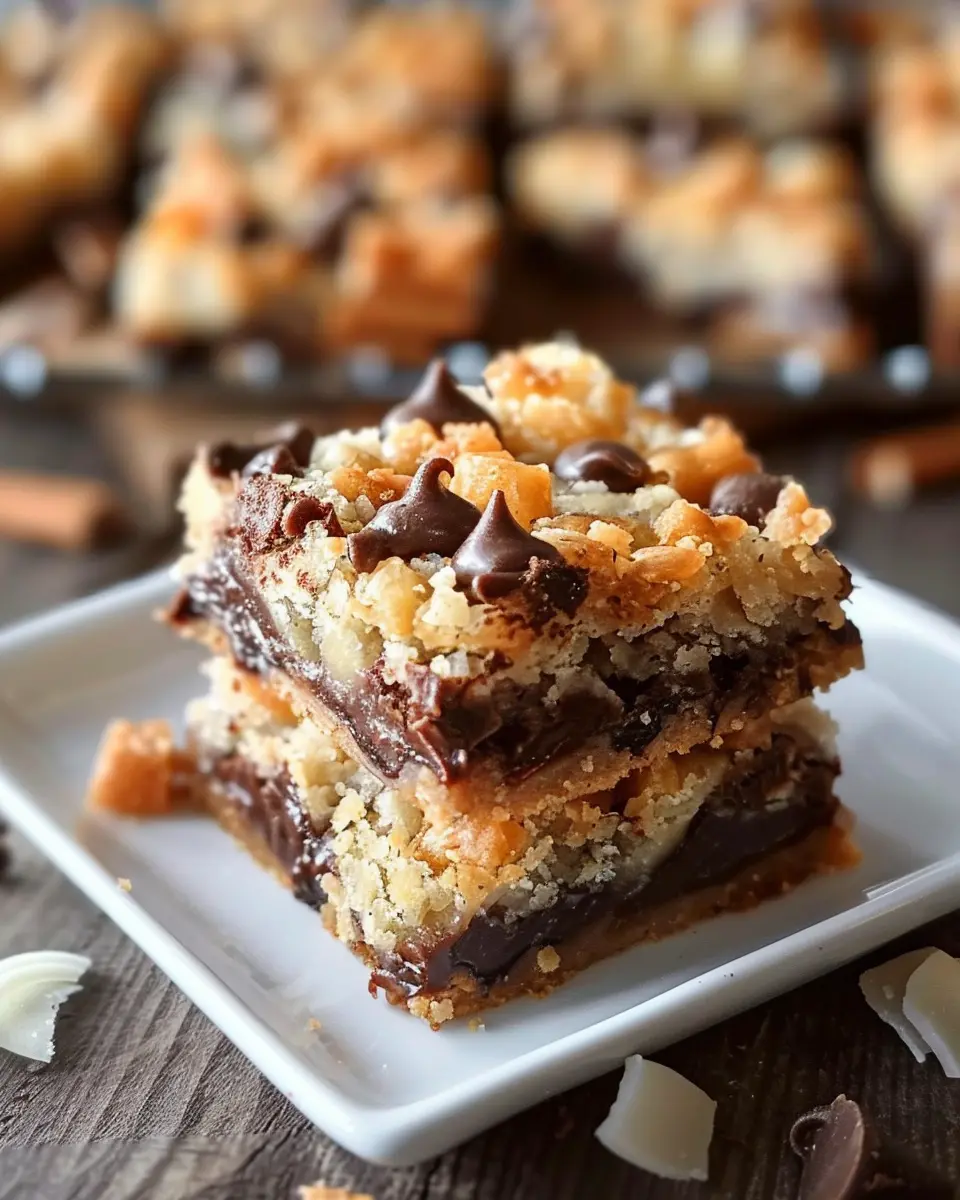
This is where the magic truly happens. Slowly and evenly pour the can of sweetened condensed milk over all the layers. This will create a lovely, gooey binding that melds everything together into a deliciously sticky treat. Make sure to cover all the layers—you don’t want any dryness in your 7 layer bars.
Bake to perfection
Slide the pan into the preheated oven and let it bake for about 25-30 minutes. You’ll know they’re done when the edges are lightly golden and the center is bubbly. The aroma wafting through your kitchen will make it hard to resist sneaking a taste already, but your patience will pay off!
Let them cool and slice
Once they’re out of the oven, allow your 7 layer bars to cool in the pan for at least 30 minutes. This cooling period is essential for them to set up properly. Once cooled, lift them out using the parchment paper and place them on a cutting board. Use a sharp knife to slice them into squares or bars, depending on your preference.
And there you have it—your very own batch of 7 layer bars! These treats are perfect for parties, gatherings, or just a cozy night in with a movie. Enjoy!
Variations on 7 Layer Bars
When it comes to 7 layer bars, the basic recipe is just the beginning! Let’s explore some exciting ways to personalize these delightful treats.
Add Your Favorite Nuts
Nuts are a fantastic way to bring new textures and flavors to your 7 layer bars. While pecans and walnuts are classic choices, why not try some almonds for a crunchier bite? For a tropical twist, consider macadamia nuts or even a sprinkle of pistachios. Just remember to chop them up well to help them distribute evenly throughout your bars.
Experiment with Different Chocolate Types
Chocolate is the star of 7 layer bars, and there’s a world of variety to explore. Milk chocolate chips are a favorite, but dark chocolate offers a more decadent and rich flavor. For something unique, try using white chocolate, or even butterscotch chips! Mixing different types of chocolate together can create a flavor explosion in each bite.
Try It with a Hint of Spice
If you’re feeling adventurous, why not introduce a kick of spice? A dash of cinnamon or nutmeg can add warmth and depth to your 7 layer bars. You could also sprinkle in a bit of cayenne for those who enjoy a sweet-and-spicy twist—just remember to start small and adjust to your taste!
Each of these variations not only amps up the flavor but also invites creativity into the kitchen. Who knows, you might just discover your new favorite version of 7 layer bars! For more ideas on recipe customization, check out This Food Blog for inspiration that celebrates flavor and creativity.
Cooking Tips and Notes for 7 Layer Bars
Use fresh ingredients for better flavor
When making 7 layer bars, the quality of your ingredients can truly elevate the final product. Opt for fresh, organic items where possible. For instance, use high-quality chocolate chips and fresh nuts. Not only do they enhance the taste, but they also contribute to better texture. According to a study by the Culinary Institute of America, fresh ingredients can noticeably change the flavor profile, transforming your bars from good to unforgettable.
The importance of cooling before slicing
Patience pays off! After baking your delicious 7 layer bars, let them cool completely in the pan. This cooling period allows the layers to set properly, ensuring that they hold together beautifully when sliced. If you try to cut them too soon, you might end up with a messy serving. Allow at least an hour for cooling—trust me, it’s worth the wait! Consider this cooling time as a moment to enjoy the delightful aroma filling your kitchen.
For more recipe inspirations, check out resources like America’s Test Kitchen or Serious Eats.
Serving Suggestions for 7 Layer Bars
Pair with a Cup of Coffee or Tea
There’s something magical about enjoying 7 layer bars with a warm cup of coffee or tea. The rich, sweet layers of coconut, chocolate, and nuts perfectly complement the complex flavors of a bold brew. Whether it’s a light morning pick-me-up or an afternoon break, this pairing elevates your treat to a whole new level. For a cozy touch, consider a flavored coffee or herbal tea that adds a hint of spice, such as chai or caramel-infused blends.
Perfect for Potlucks and Parties
If you’re looking for a crowd-pleaser, look no further than 7 layer bars. These bars are not just delicious; they are also incredibly easy to transport and serve. Simply cut them into squares and watch them disappear at your next potluck or party. Their eye-catching layers are sure to spark conversation, and they cater to various taste buds, making them an excellent choice. Grab a sturdy platter and get ready to share the magic—your friends will thank you!
For more ideas on delicious snacks for gatherings, check out this comprehensive guide on party-friendly desserts.
Time Breakdown for Making 7 Layer Bars
Preparation Time
Making 7 layer bars is a breeze! You’ll spend around 10-15 minutes prepping the ingredients. Start by gathering your graham cracker crumbs, nuts, and chocolate chips. Preheating your oven also takes just a few minutes, but it’s essential for even baking.
Baking Time
Bake these heavenly 7 layer bars for about 25-30 minutes. During this time, your kitchen will fill with irresistible scents, and you’ll know it’s almost time for indulgence! Keep an eye on them to ensure they are golden and bubbly.
Total Time
In total, expect around 35-45 minutes from start to finish. That’s not too long for a treat that can impress your friends or satisfy a sweet tooth! Once baked, allow them to cool for a bit before cutting into squares. Enjoy every square bite!
For more helpful tips and variations on 7 layer bars, check out this recipe.
Nutritional Facts for 7 Layer Bars
When indulging in 7 layer bars, understanding their nutritional content can help you enjoy these delightful treats with a bit more awareness.
Calories
A typical serving of 7 layer bars contains around 200 calories. While they are deliciously rich, keeping track of portions is key to enjoying them without overindulgence.
Sugar Content
These bars can have a sugar content of approximately 15-20 grams per serving, depending on the specific recipe and ingredients used. Sweet, but it’s advisable to balance them within your daily sugar intake guidelines. The American Heart Association recommends no more than 36 grams of added sugar per day for men and 25 grams for women.
Fiber Content
One of the more positive aspects of 7 layer bars is their fiber content, offering about 1-2 grams per serving. While this isn’t a significant source, pairing your treat with a fiber-rich snack can help keep you feeling full longer.
Enjoy your baking and snacking journey with these magic cookie bars! For more tips on moderation and balancing treats, consider checking out the USDA’s nutrition guidelines to help you navigate your daily choices.
FAQs about 7 Layer Bars
Can I make 7 Layer Bars ahead of time?
Absolutely! 7 layer bars are perfect for making ahead. You can prepare the mixture and layer it in the pan the night before and then bake it the next day. They actually taste even better after they’ve had time to sit, allowing the flavors to meld beautifully. Just make sure to cover them well to keep them fresh.
How do I store leftover bars?
Storing your delicious 7 layer bars is easy! Once they’ve cooled, cut them into squares and place them in an airtight container. You can keep them at room temperature for about 3-4 days. For longer storage, pop them into the freezer; they can last up to three months. Just remember to separate the layers with parchment paper to prevent sticking. When you’re ready to enjoy them, let them thaw in the fridge or on the counter.
What can I substitute if I have allergies?
If you have allergies, fear not! 7 layer bars are quite versatile. Here are some substitutions:
- Gluten-free: Use gluten-free graham crackers or swap in almond flour for a base.
- Dairy-free: Opt for dairy-free chocolate chips and coconut oil instead of butter.
- Nuts: If you’re allergic to nuts, simply skip the nuts or replace them with seeds like sunflower or pumpkin seeds.
It’s always wise to double-check labels to ensure your substitutes fit your dietary needs. This way, you can enjoy these sweet treats without worry! For more information on safe ingredient substitutions, check out the Food Allergy Research & Education.
Feel free to get creative and make these bars your own—you’ll find that 7 layer bars can adapt to practically any dietary preference!
Conclusion on 7 Layer Bars
In wrapping up our exploration of 7 layer bars, it’s clear why these little delights are often dubbed “magic cookie bars.” Their layers bring together a delightful medley of flavors and textures, making them a crowd-pleaser for any event, be it a cozy gathering or an exciting party.
Whether you’re indulging in chocolate chips, coconut, or crunchy nuts, each bite transports you to dessert heaven. Plus, the customizable aspect allows you to tailor your bars to satisfy any sweet tooth. Don’t hesitate to try variations—substituting ingredients can lead to exciting new creations! Venture beyond traditional paths and consider variations inspired by this recipe.
Ultimately, these bars are not just treats; they represent a sense of community and sharing in the joy of satisfying desserts. So go ahead, whip up your batch of 7 layer bars and bring a little magic to your kitchen!
Print7 Layer Bars: Indulgent Magic Cookie Bars for Sweet Cravings
7 Layer Bars, also known as Magic Cookie Bars, are the ultimate indulgence for anyone with a sweet tooth. These delightful treats feature a combination of layers that deliver a burst of flavor in every bite.
- Prep Time: 15 minutes
- Cook Time: 30 minutes
- Total Time: 45 minutes
- Yield: 24 squares
- Category: Desserts
- Method: Baking
- Cuisine: American
- Diet: Vegetarian
Ingredients
- 1 cup graham cracker crumbs
- 1/2 cup unsweetened cocoa powder
- 1/2 cup butter, melted
- 1 cup sweetened shredded coconut
- 1 cup chocolate chips
- 1 cup sweetened condensed milk
- 1/2 cup chopped nuts (optional)
Instructions
- Preheat your oven to 350°F (175°C).
- In a bowl, mix graham cracker crumbs, cocoa powder, and melted butter until combined.
- Press the mixture into the bottom of a greased 9×13 inch baking dish.
- Layer the coconut, chocolate chips, and nuts over the crust.
- Drizzle the sweetened condensed milk evenly over the top.
- Bake for 25-30 minutes, until golden brown.
- Allow to cool before cutting into squares.
Notes
- For extra flavor, try adding a pinch of sea salt on top before baking.
- Store any leftovers in an airtight container.
Nutrition
- Serving Size: 1 square
- Calories: 180
- Sugar: 12g
- Sodium: 45mg
- Fat: 8g
- Saturated Fat: 5g
- Unsaturated Fat: 2g
- Trans Fat: 0g
- Carbohydrates: 24g
- Fiber: 1g
- Protein: 2g
- Cholesterol: 15mg